Collaboration with Git
Overview
Today we’re going to get some additional experience with Git and GitHub.
Knowledge of this material is important to ensure that collaboration on your final projects goes smoothly.
If you weren’t able to attend in person, then you can email me so that I can connect you with another student that couldn’t make it. Then you two can set up a time to work through the lab (over Zoom is fine).
In our first section of the semester, we discussed how to use Git and GitHub. Now that you have a semester’s worth of experience using a remote repository, we’ll explore more advanced functionally of Git and GitHub today.
In particular, we’ll practice with a number features that become most useful when collaborating with others in a GitHub repository. There is additional information about using Git for collaboration and various other features in the appendix at the end for those of you that are curious.
We’ll work in pairs to practice collaboration with Git and how to fix issues that can arise when working in a shared Git repo.
First, we’ll do some reading to get familiar with Git and GitHub’s main features that facilitate collaboration.
Before working on the rest of the pair exercises, we’ll read through the sections below. Much of the content is just examples of usage for different commands, so you can skim those examples and use them for reference when working on the exercises.
If you finish reading before your pair, you can take care of Exercises 1 and 2 in the Pair exercises section.
Some terminology
First, so we’re all on the same page, let’s get familiar with some terminology that will appear in the materials today.
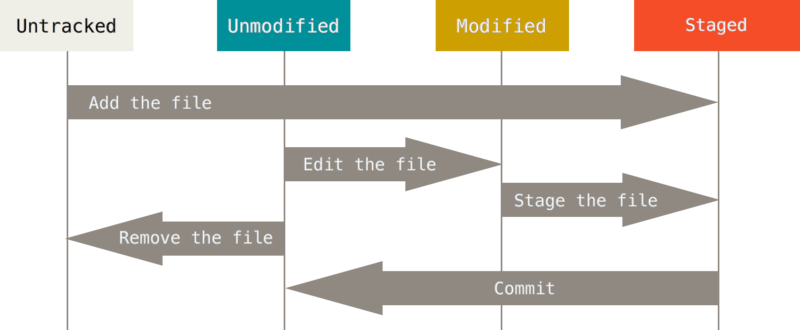
In a given repository, you may have files that are in version control (tracked) alongside files that are not yet added (untracked). Typically, you track a previously untracked file by using git add. Once a file is tracked, it will remain in that state unless you explicitly tell Git to no longer track the file.
Note that the .gitignore file helps us de-clutter Git outputs by letting Git know that what files or directories we never intend to track. But after you’ve tracked a file, if you later add it to .gitignore
When you first track a file using git add, it also goes into the “staged” state, meaning that the file will be included in the next snapshot of your repo (AKA, the next “commit”).
This is also the case when you modify a tracked file and then use git add. If, however, you make additional changes to the file before committing, those additional changes will be unstaged (but the previously added changes are still staged!).
How does Git know what changes are staged or unstaged? By adding those changes to its index! This is what Git does when you use git add, allowing it prepare for the next commit and to notice any further changes you make before committing.
So the index can be thought of as a collection of staged changes, which is converted to a commit when you use git commit.
After you commit changes to a file, the file in question switches to the “unmodified” state, and the index with staged changes is added to the commit history. In this state, using git add on the file has no effect.
If you later edit that file, it goes into the “modified” state, and git add will do what you expect it to.
The below diagram comes from the Pro Git book section 2.2 Git Basics - Recording Changes to the Repository and demonstrates how the interplay of the concepts above.
Some review of key commands you should already know
When using Git for collaboration, you will often find that much of your workflow remains similar to how you used Git when working alone. That is, you will still use the following four key commands (click to expand):
git status
git status is the most fundamental way to understand what is going on in your repo. You should use it often to remind yourself of the current state of things.
When to use: when starting or resuming work on a repo; prior to using git add to remind yourself what files have been modified or already staged; prior to using git commit to ensure you have staged all the files you want to include in your next snapshot.
git diff
The output from git diff demonstrates just how powerful Git really is. It can also be incredibly useful when editing existing code, because it shows both the state of the code before you made modifications alongside the modifications themselves. There have been many times where I’ve caught bugs in my code by inspecting git diff prior to committing my changes.
Note that because git diff shows changes to tracked files, it only becomes useful after modifying a file that you’ve already staged at some prior point.
Sometimes you will want to see the diff from a file is in the staged state, prior to committing; to do so, you can use git diff --staged.
When to use: after modifying a file that was staged at some previous point; before using git commit to do a quick spot check of your changes; when you want to see what changes were made in a particular commit.
git add
To this point, we’ve already said a good deal about git add. It stages changes in your for the next commit.
When to use: after making changes to a particular file or set of files; after making additional changes to a staged file or set of files; to prepare for the next commit.
git commit
We’ve already alluded to this command many times above as well. Use it to move staged changes into the repo’s commit history. Be sure to include a succinct and informative commit message so that your collaborators and your future self have a quick hint to understand the changes you made.
It is better to make small commits for contained changes rather than a mega commit with a diverse set of functional modifications that touch a large portion of the code. For example, if you work linearly through your problem sets then it is better to commit after completing each individual problem or even sub-problem, rather than making a single commit when the full problem set is complete.
When to use: after finishing work on a particular task; incrementally, when some contained change is complete; as often as needed so that you can create succinct but informative commit messages.
If you have any doubts about these four key commands at this point, please check in with your partner or raise your hand and I will do my best to clear things up before you continue on to the following sections.
Manual pages
Git’s built-in documentation is a good resource when in doubt about a particular command or to deepen your knowledge. There are many useful options to Git’s commands, so taking a skim through the manual pages for the commands you use most often is not a bad idea.
To see the docs for a command such as git log, you can do:
man git-logor:
git help logAlternatively, you can access these manual pages on the web at https://git-scm.com/docs. From the git log manual, we can find information on a number of options that greatly increase the usefulness of the output. We’ll see some examples later on in the next section.
Advanced Git features for collaboration
With the review out of the way, let’s jump into the main new features you’ll want to know about for collaboration.
git pull
You already know how to use git push to update your remote repository on GitHub, but to this point in the course git pull may not have been super relevant.
When it comes to collaboration, however, git pull is the very first command you should run when you sit down to work on a local copy of a shared remote repo.
Why? While you were doing other things, your collaborators could have worked on their local copies, made commits, and pushed to the shared remote repo on GitHub. So by using git pull, you will update your local copy with the changes that they made before you start making new changes.
Using git pull as a habit can help save some headaches down the line.
git log
After running git pull, if there were updates then you’ll want to get a quick sense of what changed. You already know how to view the commit history using:
git logIf you also want to see complete diffs at each step, use
git log -pHowever, the output using -p can at times be overwhelming. Often, a condensed overview of the files changed in each commit is useful to get a feel for the history:
git log --stat --summaryIf you don’t care about the files but just want a compact glance at the full history, then the following command will give a pretty graph with information about other branches in the repo’s history:
git log --oneline --decorate --graph --allThere are many other ways to use git log, so take advantage of the docs if there is something in particular that you’d like to see.
git branch
To this point, I’ve been assuming that you and your collaborators are all working on the same branch (typically main).
However, a single Git repository can maintain multiple branches of development. A workflow where each collaborator works on their own branch and then work together to merge their changes can be an effective way to collaborate and avoid too many headaches in the case of code conflicts.
To see what branches are available, use:
git branchYou will probably only see main at this point.
To create a new branch named “experimental”, use
git branch experimentalIf you now run
git branchThe “experimental” branch is the one you just created, and the “main” branch is a default branch that was created for you automatically. The asterisk marks the branch you are currently on; type:
git checkout experimentalto switch to the experimental branch. Now edit a file, commit the change, and switch back to the main branch:
git add file
git commit -m "edited file"
Alternatively, one can “stash” the changes using git stash. This saves your changes for later, and then reverts the working tree to the last HEAD (whatever the last commit was). This allows you to keep working without the changes being applied to any files. You can apply those changes later using git stash pop, which applies the changes and removes them from your stash. Or, if you wish to apply the changes to multiple branches, you can use git stash apply, which applies the changes but leaves them in your stash.
Now, you can switch back to the main branch.
git checkout mainCheck that the change you made is no longer visible, since it was made on the experimental branch and you’re back on the main branch.
You can make a different change on the main branch and commit. At this point the two branches have diverged, with different changes made in each. To merge the changes made in experimental into main, run:
git merge experimentalIf the changes don’t conflict, then the merge was successful and you can add, commit and push to the remote repository. If there are conflicts, markers will be left in the problematic files showing the conflict;
git diffwill show this. Once you’ve edited the files to resolve the conflicts,
git commit -awill commit the result of the merge. Finally,
At this point you could delete the experimental branch with
git branch -d experimentalThis command ensures that the changes in the experimental branch are already in the current branch.
If you want to remove a branch without pulling the changes into the main branch, the -D flag deletes it without checking any of the changes.
This only removes the branch from your local machine. To remove it from the remote repository, you use:
git push -d origin experimentalPull-requests
When working in a collaborative environment, instead of merging directly into the main, it is best to create a pull-request. This link has a good step-by-step explanation.
Pull requests tell repository maintainers the difference between the main repository and an individual’s branch. It will then allow maintainers to comment on the pull request and get bugs fixed before the branch is merged to the main.
Pull requests are common practice in the software development in industry.
Pair exercises
Whoever got here first should do the first two items below while your partner finishes up.
- Create a new repo (just one of you, doesn’t matter who) on github.berkeley.edu
- Add your partner(s) as a collaborator. This can be done by clicking the Settings option in the upper right and then selecting Collaborators on the menu on the left.
- Each person create a new branch (call them something different), add a file or two to your branch and practice merging to the
mainbranch. You can do either merge on the command line or use a pull request. See section Managing Branches above for the commands. (Make sure to usegit pullbefore pushing your merge to the remote repo if you do it through the command line to avoid merge conflicts.) - Test what happens when your remote repository is ahead of your local repository, but you already staged new changes.
- Have one partner push a new commit to the remote repo
- Have the other partner try to add, commit, and push new changes without pulling the most recent update and see what happens.
- Resolve the merge conflict. You can do this by calling
git pulland merging the repositories or by usinggit reset --softas described in the Reset section below.
- Test what happens when a collaborator (or you on a different computer) edits the same file?
Appendix: More Useful Git Functionality
Importing A Project
I do not recommend this process for initiating a new project. These steps are simple, until you get to creating the remote repository. Then, just like in the intro tutorial, you have you setup a new repository on Github and link it to the local one. It is easier to create the repo on Github, clone the empty repo locally, then put files in it as desired.
Assume you have a tarball linReg.tar.gz with your initial work. You can place it under Git revision control as follows.
tar xzf project.tar.gz
cd project
git init
Git will reply (something along the lines)
Initialized empty Git repository in .git/You’ve now initialized the working directory-you may notice a new directory created, named “.git”.
Next, tell Git to take a snapshot of the contents of all files under the current directory (note the .), with git add:
git add .This snapshot is now stored in a temporary staging area which Git calls the index. You can permanently store the contents of the index in the repository with git commit:
git commit -m "add"This will prompt you for a commit message. You’ve now stored the first version of your project in Git.
Making Changes
If we make changes to files file1, file2 and file3 we can add them to be commited with git add as we have discussed before:
git add file1 file2 file3You are now ready to commit. You can see what is about to be committed using git diff with the --cached option:
git diff --cached(Without –cached, git diff will show you any changes that you’ve made but not yet added to the index.)
You can also get a brief summary of the situation with git status:
git statusAlternatively, instead of running git add before git commit, you can use:
git commit -awhich will automatically notice any modified (but not new) files, add them to the index, and commit, all in one step.
Amending file to commit
What if, in the files you just commited, there was a file you forgot? This situation is handled via git’s amend option in git commit. Say we have added and committed file1
git add file1
git commit -m "adding file1"
But we realize we also meant to commit file2. We can do that by ammending the original commit as follows:
git add file2
git commit --amend -m "adding second file"
This allows you to add more files to a commit and then update the message, while keeping your original message/commmited-files there.
Undoing mistakes: checkout, reset, and revert
Some of the commands below can get you into trouble if you aren’t 100% sure of what you’re doing. Use them with extreme caution.
Checkout
git checkout can be used to look at a previous commit. It can also be used to move to a different branch, which we will look at in the next section. Here we can look at code from a previous commit with:
git checkout HEAD~1 # moves back 1 commit
git checkout HEAD~2 # moves back 2 commits
git checkout <commit_hash> # move back to a specific commit
To find commit IDs you can use git log or git reflog. You can also find commit IDs on GitHub.
Once you have looked at the commit you can go back to the most recent update using
git checkout main # or replacing main with whatever branch you are onRevert
git revert is used when you want to undo the changes made in a previous commit. It will undo a commit by creating a new commit. Consider using git revert HEAD~1, this will remove the changes that were added in the previous commit.
git revert HEAD~1
git revert HEAD~2
git revert <commit_hash>
Reset
If you added something that shouldn’t be commited or you want to reset your repo to what it looked like at a previous commit, then you need to use the git reset feature.
man git-reset

# e.g.
git reset --soft HEAD~1
git reset --hard HEAD~1
Git reset moves the tip of your working tree back to the specified revision (here, we go back one revision). The --soft flag means that the changes in the files are preserved, so all that was done was to undo the commit. If you use the --hard flag, then all changes are reverted to the specified time and later changes are lost forever.
Additional references
Here are some links that you may want to bookmark for future reference and to deepen your Git expertise.