SCF Computing Cluster
Overview
Today we’ll discuss the Statistical Computing Facility’s (SCF) cluster, which is administrated by the Department of Statistics. Much of this material comes directly from the SCF’s documentation; see the links below for more details:
SCF cluster capabilities and hardware
A cluster is a collection of computing nodes. A node is analogous to a laptop or desktop computer, with an operating system, RAM, CPUs, and sometimes GPUs.
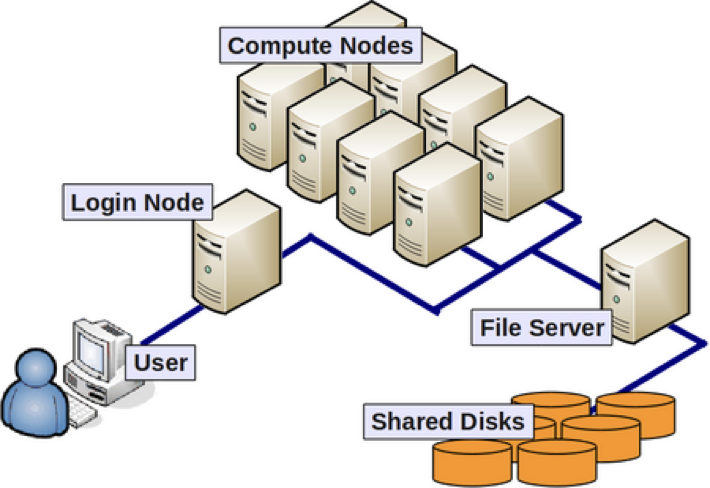
Nodes with similar capabilities or access policies are often grouped together as a partition. This allows cluster users to request the resources they need – such as number of CPU cores – from a pool of nodes, rather than specify a specific one.
The SCF cluster has 1064 cores, across 7 partitions with more than 26 nodes, but for this class we’ll use the low partition. It’s the default, so you won’t need to do anything special to use it for your jobs (we’ll explain how to submit jobs later on).
The low partition has the following resources:
- 8 nodes
- 32 cores per node
- 256 GB RAM per node
The SCF Linux cluster uses a batch job scheduler called Slurm, commonly used by large computer centers in both academia and industry. Although the SCF cluster has much greater computational capacity than our personal computers, it is a shared resource with many users. With Slurm, the cluster is able to schedule jobs asynchronously, balancing resource allocations so that everyone gets a turn. This also means that when you submit a job, it may not run until many minutes or hours later. Be sure to give yourself enough time!
Your ~/ on the SCF
Nodes in the SCF cluster use the Linux distribution Ubuntu. Every user has a private home directory which, as usual on Linux-based OSes, has the shortcut ~/. In this section, we’ll give an overview of access, disk space, and remote file transfers to and from your SCF home directory.
Logging in
The SCF has a number of login nodes which you can access via ssh.
For info on using ssh (including on Windows), see here.
For example, I’ll use ssh to connect to the dorothy node:
james@pop-os:~$ ssh <scf-username>@dorothy.berkeley.edu
The authenticity of host 'dorothy.berkeley.edu (128.32.135.58)' can't be established.
ED25519 key fingerprint is SHA256:rOY7ED/iIiTgI++Y4XHmiEl+tC+OmSGBvWp03CSII5E.
This key is not known by any other names
Are you sure you want to continue connecting (yes/no/[fingerprint])? yes
Warning: Permanently added 'dorothy.berkeley.edu' (ED25519) to the list of known hosts.
Notice that upon first connecting to a server you haven’t visited there is a warning that the “authenticity of the host … can’t be established”. So long as you have typed in the hostname correctly (dorothy.berkeley.edu, in this case), and trust the host (we trust the SCF!) then you can type yes to add the host to your known hosts file (found on your local machine at ~/.ssh/known_hosts).
You’ll then be asked to enter your password for the SCF cluster. For privacy, you won’t see anything happen in your terminal when you type it in, so type carefully (you can use Backspace if you make a mistake) and press Enter when you’re done. If you were successful, you should see a welcome message and your shell prompt, like:
<scf-username>@dorothy:~$To get your bearings, you can type pwd to see where your home directory is located on the SCF cluster filesystem:
<scf-username>@dorothy:~$ pwd
/accounts/grad/<scf-username>
Your home directory is likely also in the /accounts/grad/ directory, as mine is.
Other login nodes
Don’t run computationally intensive tasks on the login nodes!
They are shared by all the SCF users, and should only be used for non-intensive interactive work such as job submission and monitoring, basic compilation, managing your disk space, and transferring data to/from the server.
If for some reason dorothy is not working for you, the SCF has a number of nodes which can be accessed from your local machine with commands of the form ssh <scf-username>@<hostname>.berkeley.edu. Currently, these are:
aragornarwendorothygandalfgollumhermionequidditchradagastshelob
Disk space
Your home directory has a limited amount of disk space; you can check how much you have used and available using the quota command, which will show your home directory usage and quota on the line for the accounts filesystem.
<scf-username>@dorothy:~$ quota
FILESYSTEM  USE         QUOTA       %
  accounts  5.29 G      20 G        26.5
The accounts filesystem is accessible from all the nodes on the SCF cluster. This means that regardless of which login or compute node you use, you will have access to the files in your home directory. Moreover, your home directory is backed up regularly, so you are protected from accidental data loss.
If you’re running out of space, you should try to selectively delete large files that you no longer need. See here for some tips on finding large files. If all else fails, you can request additional space or request access the /scratch filesystem. The latter is a good place for large datasets, but note that /scratch is not backed up, unlike your home directory. See the previous link for more info.
For temporary files (e.g., intermediate results of a computation that you don’t need to store for later), every machine has a /tmp filesystem. However, /tmp is always linked to the specific machine you are on, meaning that if you put something in /tmp on dorothy and then later go to aragorn, you won’t find your files in the /tmp directory there. If you go back to dorothy, you will likely find them again, but /tmp is automatically wiped when a machine reboots, so only use it for files you don’t care about preserving!
Data transfer: SCP / SFTP
We can use the scp and sftp protocols to transfer files to and from any login node on the SCF cluster. scp is a shell program that should be available by default on macOS and Linux, while on Windows you can use WinSCP. WinSCP can also do sftp transfers, or you can use FileZilla on any platform for sftp. Both WinSCP and FileZilla have a GUI that allows you to drag and drop files between your local machine and a remote host.
The syntax for scp is scp <from-place> <to-place>, and you’ll typically use scp on your local machine. For example, we’ll show how to transfer the file data.csv (you can find it here) :
To SCF while on your local machine
# transfer to my home directory without renaming the file
scp data.csv <scf-username>@dorothy.berkeley.edu:~/

# transfer to the data/ subdirectory and rename the file
scp data.csv <scf-username>@dorothy.berkeley.edu:~/data/new_name.csv

# transfer to the dorothy-specific /tmp/ directory
scp data.csv <scf-username>@dorothy.berkeley.edu:/tmp/
From SCF while on your local machine
# now <from-place> is a path in my home directory on the SCF
scp <scf-username>@dorothy.berkeley.edu:~/data/new_name.csv ~/Desktop/data_scf.csv
For more information, see here. In particular, if you have a very large dataset to transfer, Globus is a better option than either scp or sftp.
Running jobs on the SCF
For this section, you’ll need to have some of this week’s materials in your home directory on the SCF cluster.
To get them, you can (and probably should) clone the course repo to your home directory on the SCF cluster:
# first ssh to an SCF login node: ssh <scf-username>@<host-name>.berkeley.edu

cd ~/ # or a subdirectory if you prefer

git clone https://github.com/berkeley-stat243/stat243-fall-2022.git
# or git@github.com:berkeley-stat243/stat243-fall-2022.git if you use SSH with git

# the files you need are here
cd stat243-fall-2022/labs/06/
As mentioned before, the SCF cluster uses Slurm to schedule jobs. We’ll learn some Slurm commands now.
Non-interactive jobs: sbatch
This is the best option when you have a long-running job where no
The first command is sbatch. To use sbatch, you will first create a bash script (you can do this on the SCF cluster if you know how to use a shell text editor like nano, or just do it locally and transfer the file to the SCF via one of the methods discussed before).
In the course repo, you will find an example bash script called submit.sh. Here’s what it contains:
#!/bin/bash

################
# SBATCH OPTIONS
################

#SBATCH --job-name=example # job name for queue (optional)
#SBATCH --partition=low    # partition (optional, default=low)
#SBATCH --error=ex.err     # file for stderr (optional)
#SBATCH --output=ex.out    # file for stdout (optional)
#SBATCH --time=00:01:00    # max runtime of job hours:minutes:seconds
#SBATCH --nodes=1          # use 1 node
#SBATCH --ntasks=1         # use 1 task
#SBATCH --cpus-per-task=1  # use 1 CPU core

###################
# Command(s) to run
###################

./example.sh
The example.sh script creates a file called testFile.txt and appends some output to that file. Note that since submit.sh is itself a bash script, you could have just put the contents of example.sh directly in submit.sh, but it is good practice to keep your computational code separate from your Slurm batch submission scripts.
Now we can submit the job using the Slurm command sbatch:
sbatch submit.shOnce you run that, your job will be queued. To check it’s status, you can use squeue:
squeue -u <scf-username> # use your username, not mineAnd now you wait. Go get a cup of coffee or get some rest! Then check back later.
Interactive jobs
Interactive jobs are the best option when you need to do many short but computationally intensive tasks which require your hands at the keyboard.
srun
This is the best option when you want to work at the Linux command line and don’t need a GUI, e.g. when debugging components of larger non-interactive job.
To run an interactive job via Slurm, you can use the srun command:
# ssh -Y <scf-username>@dorothy.berkeley.edu

# 10 minute time limit
srun  -t 00:10:00 -N 1 -n 1 -c 1 --pty /bin/bash

# uses resources already made available from the previous srun command
srun --pty --x11=first matlab # interactive matlab job
Here we used the -Y flag to ssh to run software with a GUI, such as MATLAB, which allows the GUI to open in our local machine while still running computations on the SCF cluster. For this to work, you’ll need X server software on your own machine to manage the graphical windows. For Windows, your options include eXceed or Xming and for Mac, there is XQuartz.
JupyterHub for RStudio or Jupyter Notebooks
This is the best option when you want to interact with the RStudio or Jupyter GUI while doing your computations or debugging.
The SCF’s JupyterHub is another resource for interactive computing on the SCF, allowing you to use RStudio or Jupyter on one of the cluster’s computing nodes.
Specifying resources
If you are submitting a job that uses multiple cores or nodes, you may need to carefully specify the resources you need. The key flags for use in your job script are:
--nodes(or-N): indicates the number of nodes to use--ntasks-per-node: indicates the number of tasks (i.e., processes) one wants to run on each node--cpus-per-task(or-c): indicates the number of CPUs to be used for each task
In addition, in some cases it can make sense to use the --ntasks (or -n) option to indicate the total number of tasks and let the scheduler determine how many nodes and tasks per node are needed. In general --cpus-per-task will be 1 except when running threaded code. When setting up parallel R code, you can find out how many cores there are on the node assigned to you with:
ncores <- Sys.getenv("SLURM_CPUS_ON_NODE")The SLURM_CPUS_ON_NODE environment variable is set by Slurm when the job starts running, and therefore can be accessed within your jobs. In addition to SLURM_CPUS_ON_NODE here are some other variables that may be useful: SLURM_NTASKS, SLURM_CPUS_PER_TASK, SLURM_NODELIST, SLURM_NNODES.
Monitoring your jobs
As we saw, the basic command for seeing what is running on the system is squeue:
squeue # this shows all the queued jobs!
squeue -u SCF_USERNAME # this shows your jobs
To see what nodes are available in a given partition, you can use sinfo:
sinfo -p lowFinally, you can cancel a job with scancel.
# you can find your job ID using `squeue`
scancel YOUR_JOB_ID
See the “How to Monitor Jobs” section of the SCF’s documentation on this page for some more info.
Exercise
You can either do 1. on your local machine and transfer the file to the SCF cluster, or you can do it remotely. 2 - 4 should be done on the SCF.
- Create a submission
submitBoot.shthat will execute the code inboot_proc.py. To do this I suggest copying the text fromsubmit_py.shorsubmitR.shand updating a couple lines:
- Change
job-nameto whatever you want to call this job. - Change time to
00:10:00just in case your code runs longer than one minute. - Change the
--cpus-per-taskto 3. This is where you are telling Slurm to execute in parallel on 3 CPUs. - Change the last line
python boot_serial.py.
Call
sbatch submitBoot.shto execute the R scriptboot_proc.py.Check that the execution worked by examining the
py.outfile.